
Soil Sampling
Basic steps for soil testing
- Start by contacting your County Agricultural Extension Agent (Local Offices - MSU Extension | Montana State University); some may have soil probes to loan out and they might help ship soils to a lab.
- Consider sampling good and bad areas or at least two areas if you think they will be quite different in nutrients based on observations including soil color, texture, or plant growth. See Soil Testing: Getting a Good Sample
- Select which soil parameters the lab should test. Often Extension Agents like certain soil test packages and can help you decide. Soil Testing: Once You Have the Sample has specific information.
- To interpret the test results:
- The lab report with test results may have recommendations.
- See The Soil Scoops Soil Test Interpretation, Feeding the Garden Soil, and Fertilizer Rate Calculations
- Or contact your County Agricultural Extension Agent
- Or contact Clain directly.
Additional resources
Look through Clain's presentations for information on soil sampling or search the website.
- Soil Sampling and Laboratory Selection (Nutrient Management Module No.1)
- Soil Sampling Strategies (MT200803AG)
- The Soil Scoop Soil Testing: Getting a Good Sample (pdf)
- The Soil Scoop Soil Testing: Once You Have the Sample (pdf)
- Soil Texture
- "Mason jar" test (pdf) (video by Growit Buildit)
- Ribbon test - this takes practice, adding the correct amount of water is important.
- Are home soil test kits accurate? MSU Press Release May 2019
- Comparing soil test kits with standard lab-based soil tests Crops and Soils Magazine, March 2019
- What happens to the soil sample at the lab? (video)
- What happens to a soil sample at a laboratory? posted with permission from High Plains Journal, in process of tracking down correct link.
Soil testing for phosphorus
MSU P guidelines are based on Olsen P soil tests.
Request Olsen P, rather than Bray or Mehlich-3 (M3-P) from the lab.
If conversion is necessary:
- Olsen P ≈ (M3-P * 0.45) + 1.8 at a broad range of pH
- At pH < 7, Olsen P ≈ (Weak Bray P * 0.42) + 3.5. There is not a valid conversion at pH > 7.
-
P conversions come from Mallarino 1995 https://www.agronext.iastate.edu/soilfertility/info/ComparisonofMehlich-3OlsenandBray-P1Procedures.pdf
Soil testing for pH
Soil testing to determine whether aluminum toxicity or other issues related to soil acidification are the cause of poor crop growth should be done in the top 2-4". Only go to 5-6" if there has been deep banding of N fertilizer or major use of anhydrous N.
Either submit the top 3" to a lab for analysis or sample with a field probe as follows.
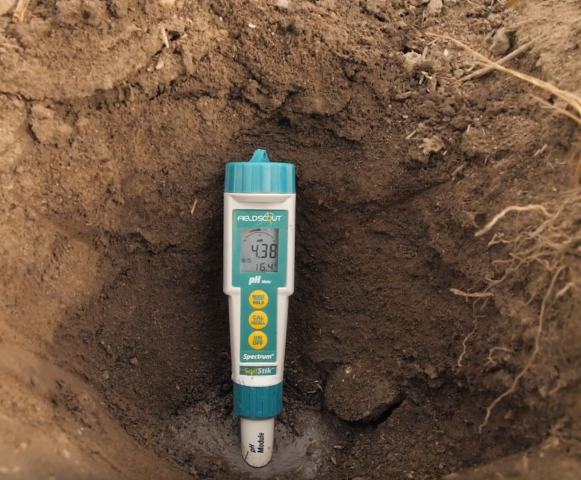
Soil pH probe in soil slurry. Image by Clain Jones
- Scrape off the duff, which generally has higher pH, so exclude it.
- Dig a hole that is 2" deep with shovel or trowel, trying to make the bottom of the hole somewhat flat - parallel to surface
- Loosen the soil at the bottom of the hole
- Squirt in distilled water until water in hole is deep enough to fully immerse probe sensor (generally at or near bottom of probe)
- Place probe in slurry and give slurry a little stir with probe
- Wait until probe reading is stabile
- Repeat at 4"
Our best readings are in a beaker 1:1 or 2:1 soil:water slurries b/c can mix better. If you test soils using a container, try to collect a 0-3" (if can easily remove duff) or 1-3" sample (if can't), since that's the root zone and most affected by low pH. There are no huge advantages of taking pH at deeper depths because either acidity is a problem in the rooting zone, or not. While things like duff layer and uneven surface are certainly issues and perhaps you're actually measuring pH at 1.5 " or 3" when want 2", we have never found pH to be low anywhere in that 1 to 3" depth, and not be low at 2", meaning it's low throughout that top 3" when it's low.
- If pH < 5, you have verified that growth issues are due to pH
- If pH is 5 to 5.5, it's possible that growth issues are due to pH, but might still have time to prevent further acidification
- If pH is 5.5 to 6.0, acidity is coming and focus should be prevention
- If pH > 6, likely don't have a problem
It is good to sample in problem areas as well as areas that appear healthy, for comparison.
Soil samples to determine liming rates should be from thoroughly mixed 0 - 6” cores, or from averages of pH in the 0 - 3” and 3 - 6” depths.